Wednesday, 27 February 2013

Cake in a Mug

Hey guys ! How has your week been so far ?? School has been quite stressful, as it's nearing the time for final projects for the semester ! I usually don't handle stress very well, & I tend to withdraw from many things when a great deal of stress is in my life ( like skipping class :$ and not doing assignments ...) Also, when I'm stressed I tend to eat more, since it comforts me hahah ( such a fattie ) So on one of those days where I just had a huge craving for cake, this is something I tried out for the first time!

I thought about baking a whole cake, or maybe even a whole batch of cookies, but I'm never capable of finishing the entire batch myself ( since no one else in my family will/can eat it ). & it's such a waste to throw it all out 'cause it's gone stale. So, I decided to go on the hunt for Cakes in a Mug! Something that will fulfill my cravings without having leftovers!


I got this recipe from Pinterest which is my favourite site to look at delicious food :D Simple Ingredients, and only takes about 5 minutes to complete and to top it all off, it tastes delightful!

recipe from http://www.yammiesnoshery.com/2012/03/chocolate-peanut-butter-mug-cake.html

Here are the Ingredients :

2 tablespoons butter
2 tablespoons peanut butter
1 egg
2 tablespoons sugar
2 tablespoons flour
3 tablespoons cocoa powder
1/8 teaspoon salt
1/8 teaspoon baking powder
3 tablespoons chocolate chips


I personally thought it was going to be too chocolateyy so I only put in 1 tablespoons of chocolate chips, but feel free to play around with the amounts, as this recipe is pretty flexible.


Add egg, sugar, baking powder and flour into your mug and mix well! I had a very slim and tall mug so it was a bit more difficult for me to make sure everything is mixed properly. Be sure to tilt the cup and see if there's any remaining flour pockets at the very bottom!


Add in the cocoa powder, carefully mix in. If you mix too fast, you'll just get cocoa dust everywhere haha.


This is what the batter should look like after everything is mixed thoroughly. Nice and rich in chocolatey goodness.


Next, in a separate small microwave safe dish, melt the butter then mix well with the peanut butter. I only have crunchy peanut butter at home, so there was some chunks of nut in my cake, but i didn't really mind. You can use whatever type of peanut butter you wish. Don't enjoy peanut butter? You can defs opt out of this and just have a nice and rich chocolate cake (:


Then, pour that mixture into your mug and mix until combined.


Last thing! Stir in your chocolate chips. Here I'm using some fanccy chocolate chips ( JK ) it's a swirl of white and milk chocolate ! But honestly, any chocolate chips works and will taste just as great!


Now all you have to do is pop it into a microwave and heat for about 1 minute. It depends on your microwave. Mine is 1000W and I did exactly 1 minute and it was done. If you like your cake more moist, you might want to cover the top of the mug with plastic wrap or something as I found the top of the cake to be slightly dry. Separating the heating time should also work so if you do 30 seconds first then another 30 seconds. 

Poof! There you have it, a 5 minute chocolate cake that... you cannot share with anybody else hehehe. This will taste EVEN BETTER if it had some freshly whipped whipped cream with it or some ice cream ! It's such a versatile recipe that I will be sure to remake in the future. Im thinking of trying a coffee version, or even a greentea/red bean version as well (: what do you think? yess ? 

Hopes this helps anyone that's having a tough week !
Till next time ~

--em


Saturday, 23 February 2013

REVIEW: Physicians Formula Gentle Cover Concealer Stick (Yellow)


I can't even begin to remember when the last time I slept before 1 am was. And because of that, I have unfortunately gained myself some permanent eyebags. Since high school, concealer has been one of my best friends haha. 


I've always wanted to try out coloured concealers since I'm intrigued by the concept of how a certain colour can cancel out other unwanted colours present on your face. This is probably what attracted me towards purchasing this concealer in the first place as it seems more benefiting than regular skin-toned concealers. As you can see on the colour wheel, the purple-ish shades of your eyebags gets cancelled out by the colour yellow. 

Swatches
Physician Formula's Gentle Cover Concealer Stick in yellow claims to "colour correct under-eye circles", and instructs you to "dab yellow concealer onto problem area" and to then "pat on a light concealer" afterwards. 

No Concealer
Concealer Applied

Concealer Spreaded
Regular concealer / powder applied on top

 Packaging: 4/5
I don't love it, but I don't hate it. The overall plastic/aluminium packaging feels pretty cheap, but at the same time, I love the convenience of a twist tube concealer. You can easily apply it on-the-go, and with your fingers. 

Colour: 3/5
Personally, I don't see much of a colour difference between the concealer when it's applied, and my regular skin colour (since I'm pale and yellow myself #asian lol). Hence, it simply justs brightens my undereye area a bit. 

Quality: 2/5
It doesn't apply on too smoothly, and gives off a slight cakey look. By mid-day, it also feels thick on my face, where the feeling of having makeup on the undereye area is pretty evident. For a $7 (neither cheap nor expensive) drugstore product, I expected a teeny bit more.

Lasting Power: 4/5
I don't know whether it's because the concealer colour is so close to my actual skin colour, but it stays on for a good majority of the day as long as you finish it off with powder.

Overall: ✮✮1/2
Despite the pretty high ratings I gave for it's packaging and lasting power, overall this product didn't do much for me. It did help brighten my undereye area more as compared to using just regular concealer, but because of the thick/oiley feeling it gives off, I would much rather stick with using regular concealer on my eyebags instead of both products at once. As a result, it'll be a no to repurchasing.

--karena.


Thursday, 21 February 2013

Aloe Honey Tea for You and Me


For all you coffee junkies out there (and those who are not), I will introduce a new and refreshing little concoction for your mornings! All you need is:

Your favourite mug
A teaspoon
A bag of green tea or white tea
Some honey
&
Aloe Vera

These ingredients are all easy finds and can be pretty open ended. I like to use raw honey just because my mom buys it (har har) and you can find aloe vera at any local nutrition/health store. 

What are the benefits for this little brew?

First of all tea is a great jumpstart for the morning (as all of you already know) but more importantly aloe vera is wonderful for the skin, relieves intestinal problems, stimulates immune system and assists lung cancer prevention! Of course most of us don't think that far to lung cancer prevention, but if it does it's job isn't it a plus? 


Let's get started!


Step one:  Make your tea! 


Step two: Add two teaspoons of honey. 
(add more if you like it sweeter)


Step three: Stir until the honey melts and by now the bag of tea should be removed. 


Step four: Add two teaspoons of aloe. 


Step five: Now you can enjoy! 


Try this healthy and delicious Aloe Honey Tea and tell me what you think ;). Till next time!


--eva.


Saturday, 16 February 2013

Get Ready With Me!

hello peeps! How was everyone's valentines day ? I had a very good one with two of my single lady friends haha. I think whether or not you have a special someone to spend the day with, Valentines day gives you the perfect excuse to dress up, pamper yourself, and of course indulge in chocolate :D Without further ado, I'd like to share with you how I get ready for a night out! p.s excuse all the messy-ness of my bathroom ! 
I usually only take about 30 mins to get my makeup, hair and outfit done. But on a night out, I prefer jamming to some music so between me singing my heart out and trying to put my face together, I like to give myself some extra time. I'll be using L'oreal Infallible in FlashBack Silver & also my Physician Formula Nude eye shadow palette. Yes, Ellie Goulding is one of my favourite artist at the moment !
Use the first shade all over the lid as a base color. Add a little more on the inner corners to give a brightening effect.
Next, I used the fifth color in the palette on the outer half of my eyelid. Not exactly the outer corner, just the outer half to give a nice gradient. blend blend blend away ! & Finally, I used the infallible color on the outer corner to really add definition and shape to my eye, blend in a little V motion and take your time blending, its worth it!
I was debating for the longest time which eyeliner i should wear. Am I the only one that has this problem ? In the end, I went with the Brown 'cause I wanted a softer look. Just line close to your upper lash line and wing it out a little at the end. If you want a slightly more dramatic look, or if you plan on putting fake lashes then thicken the line a bit!


I have a weird order of putting on my makeup, eyes first, then face. That's because I really don't enjoy ANYTHING on my face, even lotion...actually ESPECIALLY lotion haha. So if I wear face makeup, i'd put it on last. I'm using my favourite "foundation" : Clinique's Moisture Surge tinted moisturizer. The formula is so light that it's really not a foundation, and even someone like me who hates stuff on her face can handle. It gives light coverage which may not work for some people though. For my under eyebags, I'm using the Garnier skin Renew Anti Dark Circle Roller. & just a stifling brush to apply the tinted moisturizer.

hehe, my eye bags are virtually uncoverable, I was just born with them. Trust me, i've tried A LOT of concealers, it just... helps, but it doesn't get rid of them entirely. The Garnier concealer is one that i've stuck with using for about ... atleast 1 year already! I would definitely recommend it, super convenient, lasts forever, decent coverage ( unless you have super eye bags like meee ).


Sometime around here, I think I went to get a snack LOL. I mean.. it is a night about pampering right ?? So go ahead and apply your preferred face makeup. For me, I like to squeeze about a pea size amount on the back of my hand, and then dab it on my forehead, cheeks, nose and chin. Then using my stifling brush, just blend it out !
On to my outfittt! As much as I would love to stay in my hoodie and sweats, It's nice to have an excuse to dress up to eat at a fancy restaurant too. I'm wearing a black dress from Bauhaus, I love the details of this dress, the slits on the sleeves and the little fold on the skirt. It's still pretty cold here in vancity so I had to wear tights under.


Don't forget to accessorize! My favourite necklace from Hong Kong is this double ring one! Of course, what's a night out without perfume ;) Dot by Marc Jacob was my choice for the night, nice and floral-y!


To finish off the entire look, I used benetint on my lips to add a nice flush on my lips. Popped on a jacket, and I'm all ready to go out and enjoy the night!!

Hope you enjoyed my night out routine hehe
*winks* have a wondeeerful weekend lovely people !

--em

Wednesday, 13 February 2013

Lovestruck

Did I just use this post as an excuse to have a reason to take pictures with my heart patterned bedsheets? Probably ;)

But with that aside, Valentine's Day truly brings love in the air. I miss the childhood days where giving each of your classmates a Valentine and chocolate made up the entire school day, and I especially don't miss how it's now replaced by papers and midterms (grrr). Those were also the days where the entire class was your Valentine, and no one was singled out. However, whether you have a Valentine this year or not, the day should be celebrated with love, and by feeling loved. 

Who says I can't have fun despite not having a tall, dark, handsome man (har har) to come home to on the 14th? Below are some tips I plan on implementing into my day to make it feel like any other day of the year .. with just a bit more love for myself.

Laughter

2+ years ago :')

Gather up your friends, and have an amazing time. Laughter really is the best medicine, and never fails to cheer me up everytime. During my lunch break at school today, a little game of truth or dare came up to help pass the time. As a result, I dared one of my friends to go up to a stranger and ask her to be his valentine. We had a huge laugh out of it cause public embarrassment is simply hilarious haha. I also love to look back at old pictures and relive the memories all over again. Another way is to watch the funniest movie you know. Mean Girls anyone?

Fooooood

image via

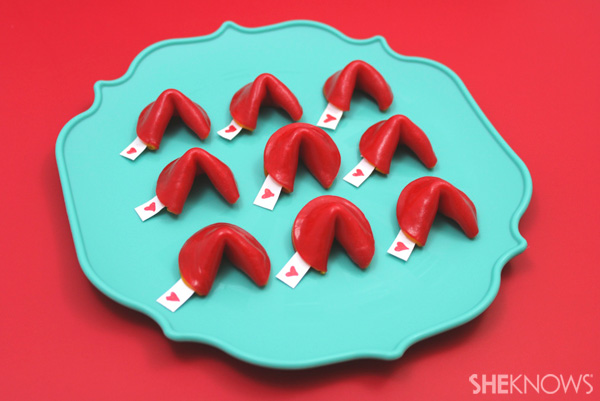
Go on Pinterest or Google and search up all those tasty Valentine's Day recipes. They look amazingly cute, and gives you something productive to do. Those, by the way, are fortune cookies made with fruit roll-ups. I'm sold. And marrying the next guy that makes me those (jk.. maybe).

Retail Therapy

Anyone else a hoarder of pretty shopping bags?

Sadly, I get a bit too excited from buying things, and spending the money I don't have lol. But having a few new things once in a while really helps brighten your mood. It's sort of like having a new routine in life, instead of sticking with the same ol' same ol'. It's also an excuse to buy cardigans that just happen to be full of hearts and pink all over ..

Music


Shall I even explain? Music has the ability to completely foster one's mood. Below is a song that brings me up everytime, due to my inability to not sing/dance along. 90's music ftw :)


My amazing Valentine for the year
So for those of you who are single this year, and even those who are not, remember to become lovestruck with the all the little things around you
xoxo.

--karena. 

Sunday, 10 February 2013

Hello Healthy Lips

Greetings beautiful earthlings! I am back with a review/tutorial. Initially I wanted to do a tutorial on a luscious gradient "just-bitten" lip look but I have decided to push that back a little further. So now instead, I will be introducing some products and ways to keep your lips looking kissable and healthy!

First of all, I must confess I have the most sensitive lips. In the winter it's too dry making my lips peel, in the summer it's too dry and my lips peel...well lets just say all year round if I don't pay special care to them---they will easily peel (I know, you must be thinking...dang girl, that's not attractive! And I can't agree more)! I'm sure I'm not the only one with these "lip-problems" therefore I have decided to share my recipe of how to keep your lips in it's best shape.


The two products I absolutely adore for keeping my lips in it's tip top shape would be:
Smith's Strawberry Lip Balm
and
Lioele All Night Moisture Lip Essence

Why am I so in love with these two products?
Well first, Smith's keeps my lip quenched for hours! Compared to the raved Burt's Bee or the Maybelline Baby Lips (which both products I have tested out for a while now) I have constantly been coming back to my Smith's lip balm. Honestly, I think it's a well worth spent 7 bucks at Sephora. Although the smell of the lip balm smells sort of artificial strawberry-like I didn't mind it as much as the Burt's Bee honey lip balm I had used for a couple of months because frankly that thing smelt putrid! And for the most important reason it keeps my lips soft for hours longer so I don't have to continue reapplying it! I love to use this daily, whether for a simple day of minimal make up or applying this under lipgloss and lipsticks it does it's job extremely well. 

The ingredients: Petrolatum, lanolin, white beeswax, strawberry perfume flavor

Lasting Power: 8/10
Smell: 7/10
Worth it's Price: 8/10

I honestly don't think I'll find anything else as satisfying as this lip balm...I can confidently say EOS doesn't even compare (although that lip balm definitely wins in the 'flavor' department). 

How I would rank the lip balms:
Smith's > Burt's Bee > EOS > Maybeline Baby LIps


As for the Lioele All Night Moisture Lip Essence I can tell you this is one product I am going to also rave about. When I had initially bought this product I wasn't confident in it but because I desperately needed a night-time remedy for my dry-flakey lips (due to my lips drying at night because of the strong heater in my room when I sleep) so I gave it a quick approval and just ordered it, like a roll of the dice and hoped for the best. 

This product does exactly what it says! It keeps your lips moisturized all night and by the morning you got yourself some soft lips that don't need you to peel at it. 

Lasting Power: 9/10 (It's an all-nighter, that explains itself)
Smell: 9/10 (not much of any, still smells a little artificial but no big deal)
Worth It's Price: 7/10

It's 12 bucks on PrettyandCute, I feel like for a tube of lip essence it's a little pushing it but I can still pass it as worth it!


Five Rules for Healthy Lips:
1. Apply a coat of lip balm underneath the lip products you are going to use for the day.
2. Keep your lips quenched for bedtime
3. Simple, drink water
4. Keep your hands to yourself, stop constantly peeling at your lips if they have dried and are flaking
5. Remember your lips are just as important as your skin!

Because of following these rules I have flakey-lips no more! 

Thanks for reading and I hope it was helpful! 

'Til next time!


--eva. 


Wednesday, 6 February 2013

Review: Physicians Formula Shimmer Strips & Milani Liquif'eye

Itsss review time! I was going to save up more products and review it all at once, but these two products have just been so wonderful that I had to share it with you guys right away! The two products I'll be talking about is the Physicians Formula shimmer strips: custom eye enhancing shadow and liner and the Milani liquif'eye in Brown.


So lets start off with the eyeshadow palette shall we? It comes with 9 colors and a little foam brush & I got it at Shoppers Drug Mart for around 12$. I think it's like 10$ in the states ? luckky! Anyyyways, I got the one in Nude 'cause the packaging was just sooo adorable, I couldn't pass up on it hehe. Theres 2 other palettes called smoky, and fashionista. All 9 colors are shimmery/ pearlescent which are perfect for meee, but not so much if you like matte colors!


If you look carefully, its actually placed in a way so that you can view it as 3 triplets of color ( quite smart and convenient since it basically shows you your base, highlight and contour color ). The brush is in an angular shape so that you can "wet" it slightly and use the eyeshadows as eyeliner.
top right shade is the first shade in the palette and continues to the top left and down to the bottom right and so on.
Here are the swatches! I wouldn't say the color payoff is great for these, but the shades are very wearable and true to the pan color. You'll just have to get a bit more of the product if you want a really rich, heavy look.


This is a swatch of what it looks like if you use the shadow as liner. It works really great as a soft eyeliner actually, and if you like the smudge / smoky eyeliner look, you'll like this!

Packaging: 5/5 (SO CUTEE! & the size is great for travelling too!)
Color: 4/5 (great if you like shimmery colors like me, find something else if you prefer matte colors)
Quality: 3.5/5 (The colors aren't super pigmented and the brush is a little cheap looking, but for 10-12$ it's not so bad)
Repurchase: If i ever finish using it ( which could take me a while ) yes, yes I woulddd
Overall: 4/5

Next, is the Milani Liquif'eye which I'm sure many of you have heard it's rave from other bloggers/youtubers. I am definitely an eyeliner junkie, I just keep on getting them even when I already have ones I like. But, pencil eyeliner wise, I will always be searching for the ultimate smudgeproof one! I've been wanting to try the Milani eyeliner since EVERYONE says it's so great, but it was like impossible to find in Canada until Karena & I wondered into superstore one day ( NOT intending to buy makeup actually lol ) and found out that they sell Milani products now! I was soo excited to try this eyeliner, and let me tell you that it has not disappoint!
On the left is the original swatch of the eyeliner, it seriously goes on like butter. That's the best way to describe it, so smooth and creamy and pigmented. The picture on the left is after 15+ seconds and after I rubbed it vigorously! I don't know if you can tell, but that spot on my hand actually turned quite red since I rubbed it so hard. Yet the eyeliner has..NOT SMUDGED at all! After this eyeliner sets, it stays on no matter what you throw at it ( i sweaar! ) love love love this sweet little creation. & what's even better ? it's only 5.99 ! damn, too good to be true right ? I think i'm going to go get a couple more of these just in case superstore suddenly decides not to sell Milani products anymore ):

Packaging: 4.5/5 ( if it came with it's own sharpener, that would just be the cherry on top)
Color: 5/5 ( super pigmented )
Lasting Power: 5/5 ( I actually think 10/5 is more suitable to describe how amazing it is)
Repurchase: HELL YES!
Overall: 5/5


Here's a simple ( & my favourite ) look created by both these products ! I tightlined using Milani and used the black eyeshadow to act as liner to fill in my eyelash line & 2 other colors to create a simple, everyday look!

Hope this review was helpful !
Happy early chinese new year for those who celebrate it ( hehe red pockets! )

--em